Add a Dropdown Menu to a WordPress Site

How to Add Dropdown Menus to (most) WordPress Sites

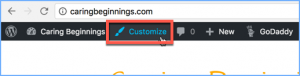
The easiest way to do this is usually via the “Customizer” at the top of the WordPress site.  You will see this option after logging in as a site administrator.

    1. Click on Customize at the top of the page

      Theme Customizer Button in WordPress

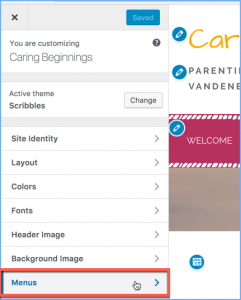
    2. Click on “Menus” on the left-hand sidebar

      Menu Customization Option in WordPress Theme Customizer

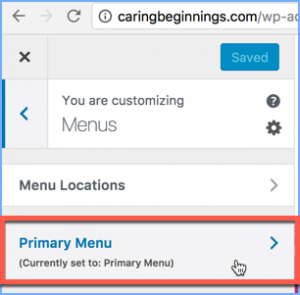
    3. Select the menu you want to edit (e.g. the “Primary Menu”)

      Selecting the Primary Menu for Customization in the WordPress Theme Customizer

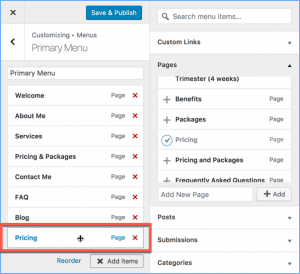
    4. In the new sidebar that pops up, scroll until you find the item that you want to add to the menu.  Click the “+” sign next to the item

      Adding a New Menu Item to a WordPress Menu in the Theme Customizer

    5. Note that the page has been added to the list of menu items on the left

      Added a New Menu Item to a WordPress Menu in the Theme Customizer

    6. Click and drag the menu item until it is nested beneath the top-level item, from which you wish the drop-down to originate

      Repositioning a WordPress Menu Item

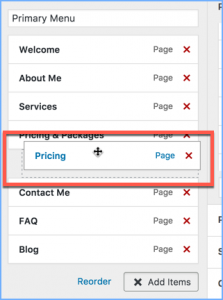
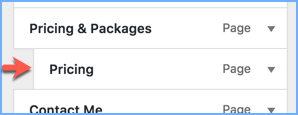
    7. When you are done placing the “child” item, make sure that it is slightly indented from the “parent” item.  If it is not indented, then click and drag the child item slightly to the right.

      Designating a Menu Item as a Submenu Item in WordPress Theme Customizer

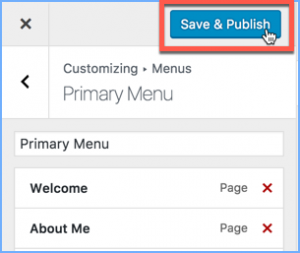
    8. Click “Save and Publish” at the top of the sidebar

      Save and Publish Button in WordPress Theme Customizer


Voilà!

A Working Dropdown Menu in WordPress


Thank you to Monica Vandenberg with Caring Beginnings for asking how to create sub-menus in WordPress, and for allowing us to use her site images in this blog post.

How to Limit Application Pool Permissions

The Problem:

Our company has a lot of data, and a lot of applications.  Sometimes we want to give an application access to a folder of data, but only that folder.  Perhaps we only want to permit read access, and deny write access.  This is simple enough if the application is a desktop application on a domain machine; we simply update role memberships for the application’s user, and then the application has access to the data that it needs.

But what if our application is a web app?  How can we control application pool permissions to file resources?

The Solution:

Control Application Pool Permissions: Run as a Controlled User

Because each app runs within an App Pool, and an App Pool is an actual Windows process that is somewhat managed by IIS itself, we can configure individual App Pools to run under specific users.  We then reassign apps to run under those app pools, and voila: the apps are then running under the desired user.  In this way we can control application pool permissions.

This can be useful if apps A, B, and C need access to File Server X, and app D needs access only to File Server Y.  Access control can then be controlled on a user level, effectively controlling access for the apps.

On that note, it may be useful to have your system administrator create users specifically for these app pools.

To run an app pool under a specific user:

  • In IIS Manager, visit the Application Pools
  • Right click on the App Pool that you wish to run under a specific user, and click Advanced Settings
  • Click the Ellipses (“…”) next to the Identity property value
  • Choose Custom Account and click Set
  • Provide a username and password for the app pool to use:
  • Click OK

Read more